Putting it Together: How Integration Testing Works
Imagine your Flutter app is like a big machine with many parts. Integration testing is like running a test on the entire machine, not just individual parts.
- Regular tests (unit tests and widget tests): These are like checking each screw, bolt, and gear in the machine to make sure they’re working properly on their own.
- Integration testing: This is like running the machine and seeing if all the parts work together smoothly. You press buttons, turn knobs, and see if the machine does what it’s supposed to do.
Integration tests help catch problems that might happen when different parts of your app interact. For instance, imagine a button that adds items to a shopping list. An integration test would press the button and check if the item is actually added to the list, making sure these two parts of the app are talking to each other correctly.
In short, integration testing helps you build a more reliable and well-oiled machine, which is your awesome Flutter app!
Why Firebase Test Lab Matters for Flutter Apps
Local testing with Flutter’s integration_test package is great, but it has limitations:
- Limited Devices: You’re stuck with what you have (emulators or a few physical devices).
- Manual & Time-Consuming: Running tests on each device takes time and effort.
- Uncontrolled Network: Local network might not reflect real-world conditions.
Firebase Test Lab tackles these issues:
- Wider Device Coverage: Tests run on a vast array of real devices with various configurations.
- Scalability & Automation: Runs tests in parallel on multiple devices, saving time and integrating with CI pipelines.
- Controlled Network Environment: Simulates real-world network conditions for better testing.
In short, Firebase Test Lab offers a more comprehensive testing experience by providing real-world device variety, automation, and controlled network environments.
Important Note:
The sample project uses:
- Flutter 3.22.1
- Dart 3.4
- AGP 8.4.0
If you are using an old version of Flutter or some other version of AGP, you may face some error. So it is suggested that if you are creating a new project or working on an existing project, please upgrade your flutter version to 3.22.0 to avoid the errors.
Let’s Setup the Flutter Project
Create a Flutter Project
Assuming you have already installed the Flutter SDK & IDE in your system (if not you can check the official documentation and then continue), open a command prompt, terminal, or PowerShell window depending on your operating system. Then navigate to the directory where you want to create your Flutter project.
Use the following command to create a new Flutter project named my_app:
flutter create my_app
This command will create the basic project structure for your Flutter app in the my_app directory.
Alternatively you can create a new flutter project directly from your IDE also.
Write the code
In this app we will be creating a login page and upon successful authentication we will navigate to the home page.
- In the main.dart file we will write the code for Login Page and Home Page
import 'package:flutter/material.dart';

void main() {
  runApp(const MyApp());
}

class MyApp extends StatelessWidget {
  const MyApp({super.key});

  @override
  Widget build(BuildContext context) {
    return const MaterialApp(
      title: "Firebase Test Lab Sample",
      home: LoginPage(),
    );
  }
}

class LoginPage extends StatefulWidget {
  const LoginPage({super.key});

  @override
  State<LoginPage> createState() => _LoginPageState();
}

class _LoginPageState extends State<LoginPage> {
  final _formKey = GlobalKey<FormState>();
  final _emailController = TextEditingController();
  final _passwordController = TextEditingController();

  @override
  void dispose() {
    _emailController.dispose();
    _passwordController.dispose();
    super.dispose();
  }

  @override
  Widget build(BuildContext context) {
    return Scaffold(
      appBar: AppBar(
        title: const Text('Login'),
      ),
      body: Padding(
        padding: const EdgeInsets.all(16.0),
        child: Form(
          key: _formKey,
          child: Column(
            children: [
              TextFormField(
                key: const Key('email_field'),
                controller: _emailController,
                decoration: const InputDecoration(
                  labelText: 'Email',
                ),
                validator: (value) {
                  if (value!.isEmpty) {
                    return 'Please enter your email address';
                  } else if (!RegExp(
                          r"^[a-zA-Z0-9.a-zA-Z0-9.!#$%&'*+-/=?^_`{|}~]+@[a-zA-Z0-9]+\.[a-zA-Z]+")
                      .hasMatch(value)) {
                    return 'Please enter a valid email address';
                  }
                  return null;
                },
              ),
              const SizedBox(height: 16.0),
              TextFormField(
                key: const Key('password_field'),
                controller: _passwordController,
                decoration: const InputDecoration(
                  labelText: 'Password',
                ),
                obscureText: true,
                validator: (value) {
                  if (value!.isEmpty) {
                    return 'Please enter your password';
                  } else if (!RegExp(r"^(?=.*[A-Za-z])(?=.*\d)[A-Za-z\d]{8,}$")
                      .hasMatch(value)) {
                    return 'Password must be at least 8 characters long and contain at least one letter and one number';
                  }
                  return null;
                },
              ),
              const SizedBox(height: 16.0),
              ElevatedButton(
                onPressed: () async {
                  if (_formKey.currentState!.validate()) {
                    Navigator.push(
                      context,
                      MaterialPageRoute(
                        builder: (BuildContext context) {
                          return const HomePage();
                        },
                      ),
                    );
                  }
                },
                child: const Text('Login'),
              ),
            ],
          ),
        ),
      ),
    );
  }
}

class HomePage extends StatelessWidget {
  const HomePage({super.key});

  @override
  Widget build(BuildContext context) {
    return Scaffold(
      appBar: AppBar(),
      body: const Center(
        child: Text(
          key: Key('Home Page'),
          "Home Page",
        ),
      ),
    );
  }
}
Set up Integration Testing Dependencies
- Open the
pubspec.yamlfile. - Under the
dev_dependenciessection of thepubspec.yamlfile, add theintegration_testpackage and save the file.
dev_dependencies:
  flutter_test:
    sdk: flutter
  integration_test:
    sdk: flutter
- Open your terminal and navigate to your project directory (if you’re not already there) and run the following command to install the newly added dependencies:
flutter pub get
Write the Integration Tests
- Inside your project’s root directory, create a new directory named
integration_test. This directory will hold your integration test files. - Inside the
integration_testdirectory, create a new Dart file (e.g.,integration_test.dart). This file will contain your integration test code. - Inside the
integration_test.dartfile we will write our integration test code like this:
import 'package:flutter/material.dart';
import 'package:flutter_test/flutter_test.dart';

import 'package:my_app/main.dart';
import 'package:integration_test/integration_test.dart';

void main() {
  IntegrationTestWidgetsFlutterBinding.ensureInitialized();

  testWidgets('Login and navigate to home page', (WidgetTester tester) async {
    // Build the app and trigger a frame.
    await tester.pumpWidget(const MyApp());

    // Enter the email and password.
    await tester.enterText(
        find.byKey(const Key('email_field')), '[email protected]');
    await tester.enterText(
        find.byKey(const Key('password_field')), 'Password123');

    // Tap the login button.
    await tester.tap(find.byType(ElevatedButton));
    // Wait for the home page to load.
    await tester.pumpAndSettle();

    // Verify that the home page is displayed.
    expect(find.text('Home Page'), findsOneWidget);
  });
}
Preparing to run tests from an APK file
To check if the app has the same behavior across multiple devices and configurations, we’re going to use Firebase Test Lab for. Also, to automate the process of running the tests whenever a new commit is pushed to a git repository, we’re going to use GitHub Actions.
In order to run the tests purely from an APK file, we need to do a little bit of a setup for the native Android project of the Flutter app. In the native Android world, there are instrumentation tests and we are basically going to hook up the multiplatform Flutter integration tests to run as if they were native instrumentation tests on Android.
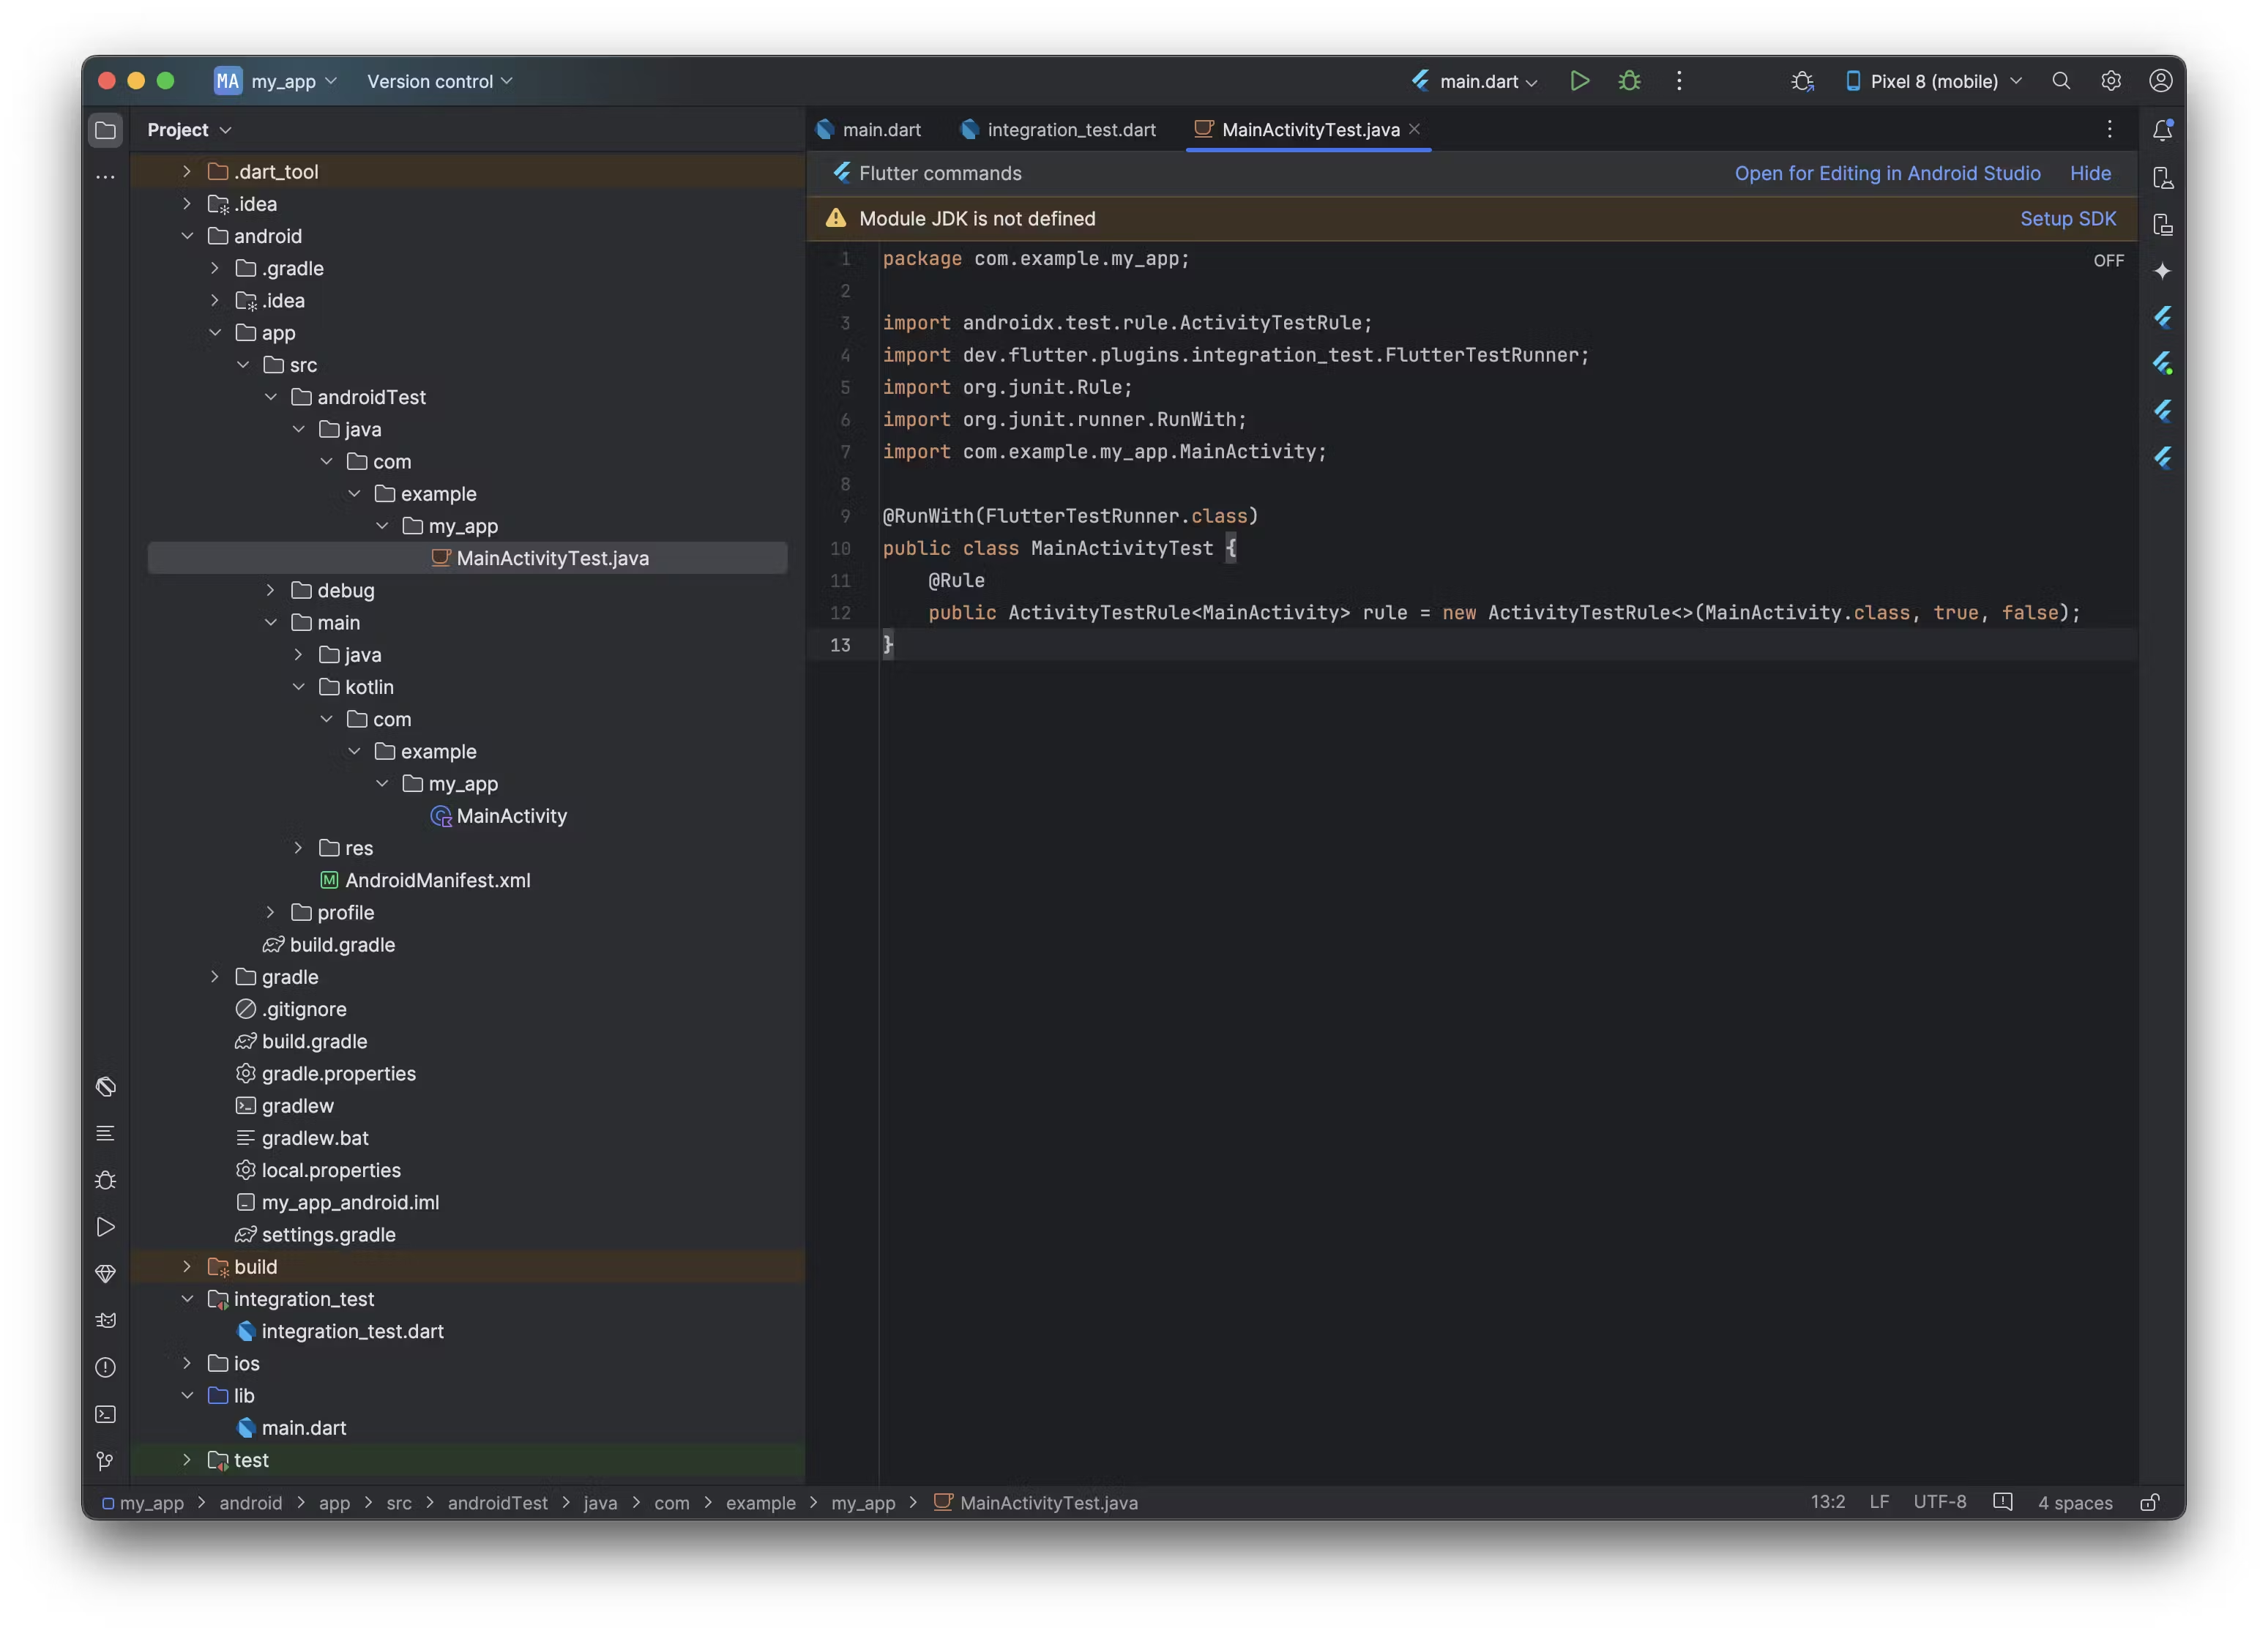
- Inside android/app/src create two new folders androidTest/java. Then create nested folders with names according to YOUR project’s package name. You will be able to find the package name inside the
MainActivity.javaorMainActivity.ktfile. In our case the package name iscom.example.my_app. - Now we will create
MainActivityTest.javafile. The path of the file will look likeandroidTest/java/com/example/my_app/MainActivityTest.java. - Inside this
MainActivityTest.javafile we will write some code as follows:
package com.example.my_app; // Change the package name according to your package name

import androidx.test.rule.ActivityTestRule;
import dev.flutter.plugins.integration_test.FlutterTestRunner;
import org.junit.Rule;
import org.junit.runner.RunWith;
import com.example.my_app.MainActivity; // The MainActivity should be imported from your package

@RunWith(FlutterTestRunner.class)
public class MainActivityTest {
 @Rule
 public ActivityTestRule<MainActivity> rule = new ActivityTestRule<>(MainActivity.class, true, false);
}
Note:
- Update the package name
- Import the MainActivity from the same package
After this your project structure should look like this:
- Now open the app level
build.gradlefile (android/app/build.gradle) and update the code as follows:
plugins {
    id "com.android.application"
    id "kotlin-android"
    id "dev.flutter.flutter-gradle-plugin"
}

def localProperties = new Properties()
def localPropertiesFile = rootProject.file("local.properties")
if (localPropertiesFile.exists()) {
    localPropertiesFile.withReader("UTF-8") { reader ->
        localProperties.load(reader)
    }
}

def flutterVersionCode = localProperties.getProperty("flutter.versionCode")
if (flutterVersionCode == null) {
    flutterVersionCode = "1"
}

def flutterVersionName = localProperties.getProperty("flutter.versionName")
if (flutterVersionName == null) {
    flutterVersionName = "1.0"
}

android {
    namespace = "com.example.my_app"
    compileSdk = 34
    ndkVersion = "26.1.10909125"

    compileOptions {
        sourceCompatibility = JavaVersion.VERSION_1_8
        targetCompatibility = JavaVersion.VERSION_1_8
    }

    defaultConfig {
        applicationId = "com.example.my_app"
        minSdk = 21
        targetSdk = 34
        versionCode = flutterVersionCode.toInteger()
        versionName = flutterVersionName
        // Add these lines
        multiDexEnabled true
        testInstrumentationRunner "androidx.test.runner.AndroidJUnitRunner"
    }

    buildTypes {
        release {
            signingConfig = signingConfigs.debug
        }
    }
}

flutter {
    source = "../.."
}

dependencies {
     // Add these dependencies
     implementation 'androidx.multidex:multidex:2.0.1'
     androidTestImplementation "androidx.test:runner:1.2.0"
     testImplementation 'junit:junit:4.13.2'
     androidTestImplementation 'androidx.test.espresso:espresso-core:3.2.0'
     androidTestImplementation 'androidx.test:rules:1.2.0'
     androidTestImplementation 'com.android.support.test:rules:1.0.2'
}
Build the apk files
- Open the terminal in your project directory and run the following commands:
flutter clean
flutter pub get
pushd android
flutter build apk
./gradlew app:assembleAndroidTest
./gradlew app:assembleDebug -Ptarget=integration_test/integration_test.dart
popd
Note:
If you have your integration testing code in a file other thanintegration_test.dart, then in./gradlew app:assembleDebug -Ptarget=integration_test/integration_test.dartin this command after-Ptartget=provide your integration test file path
Once the command is run successfully you will get two apk files (inside the build folder of your project directory) at build/app/outputs/apk/debug/app-debug.apk and build/app/outputs/apk/androidTest/debug/app-debug-androidTest.apk paths respectively.
Let’s Setup Firebase Testlab
- If you already have a firebase project, you can use that or you can create a new project.
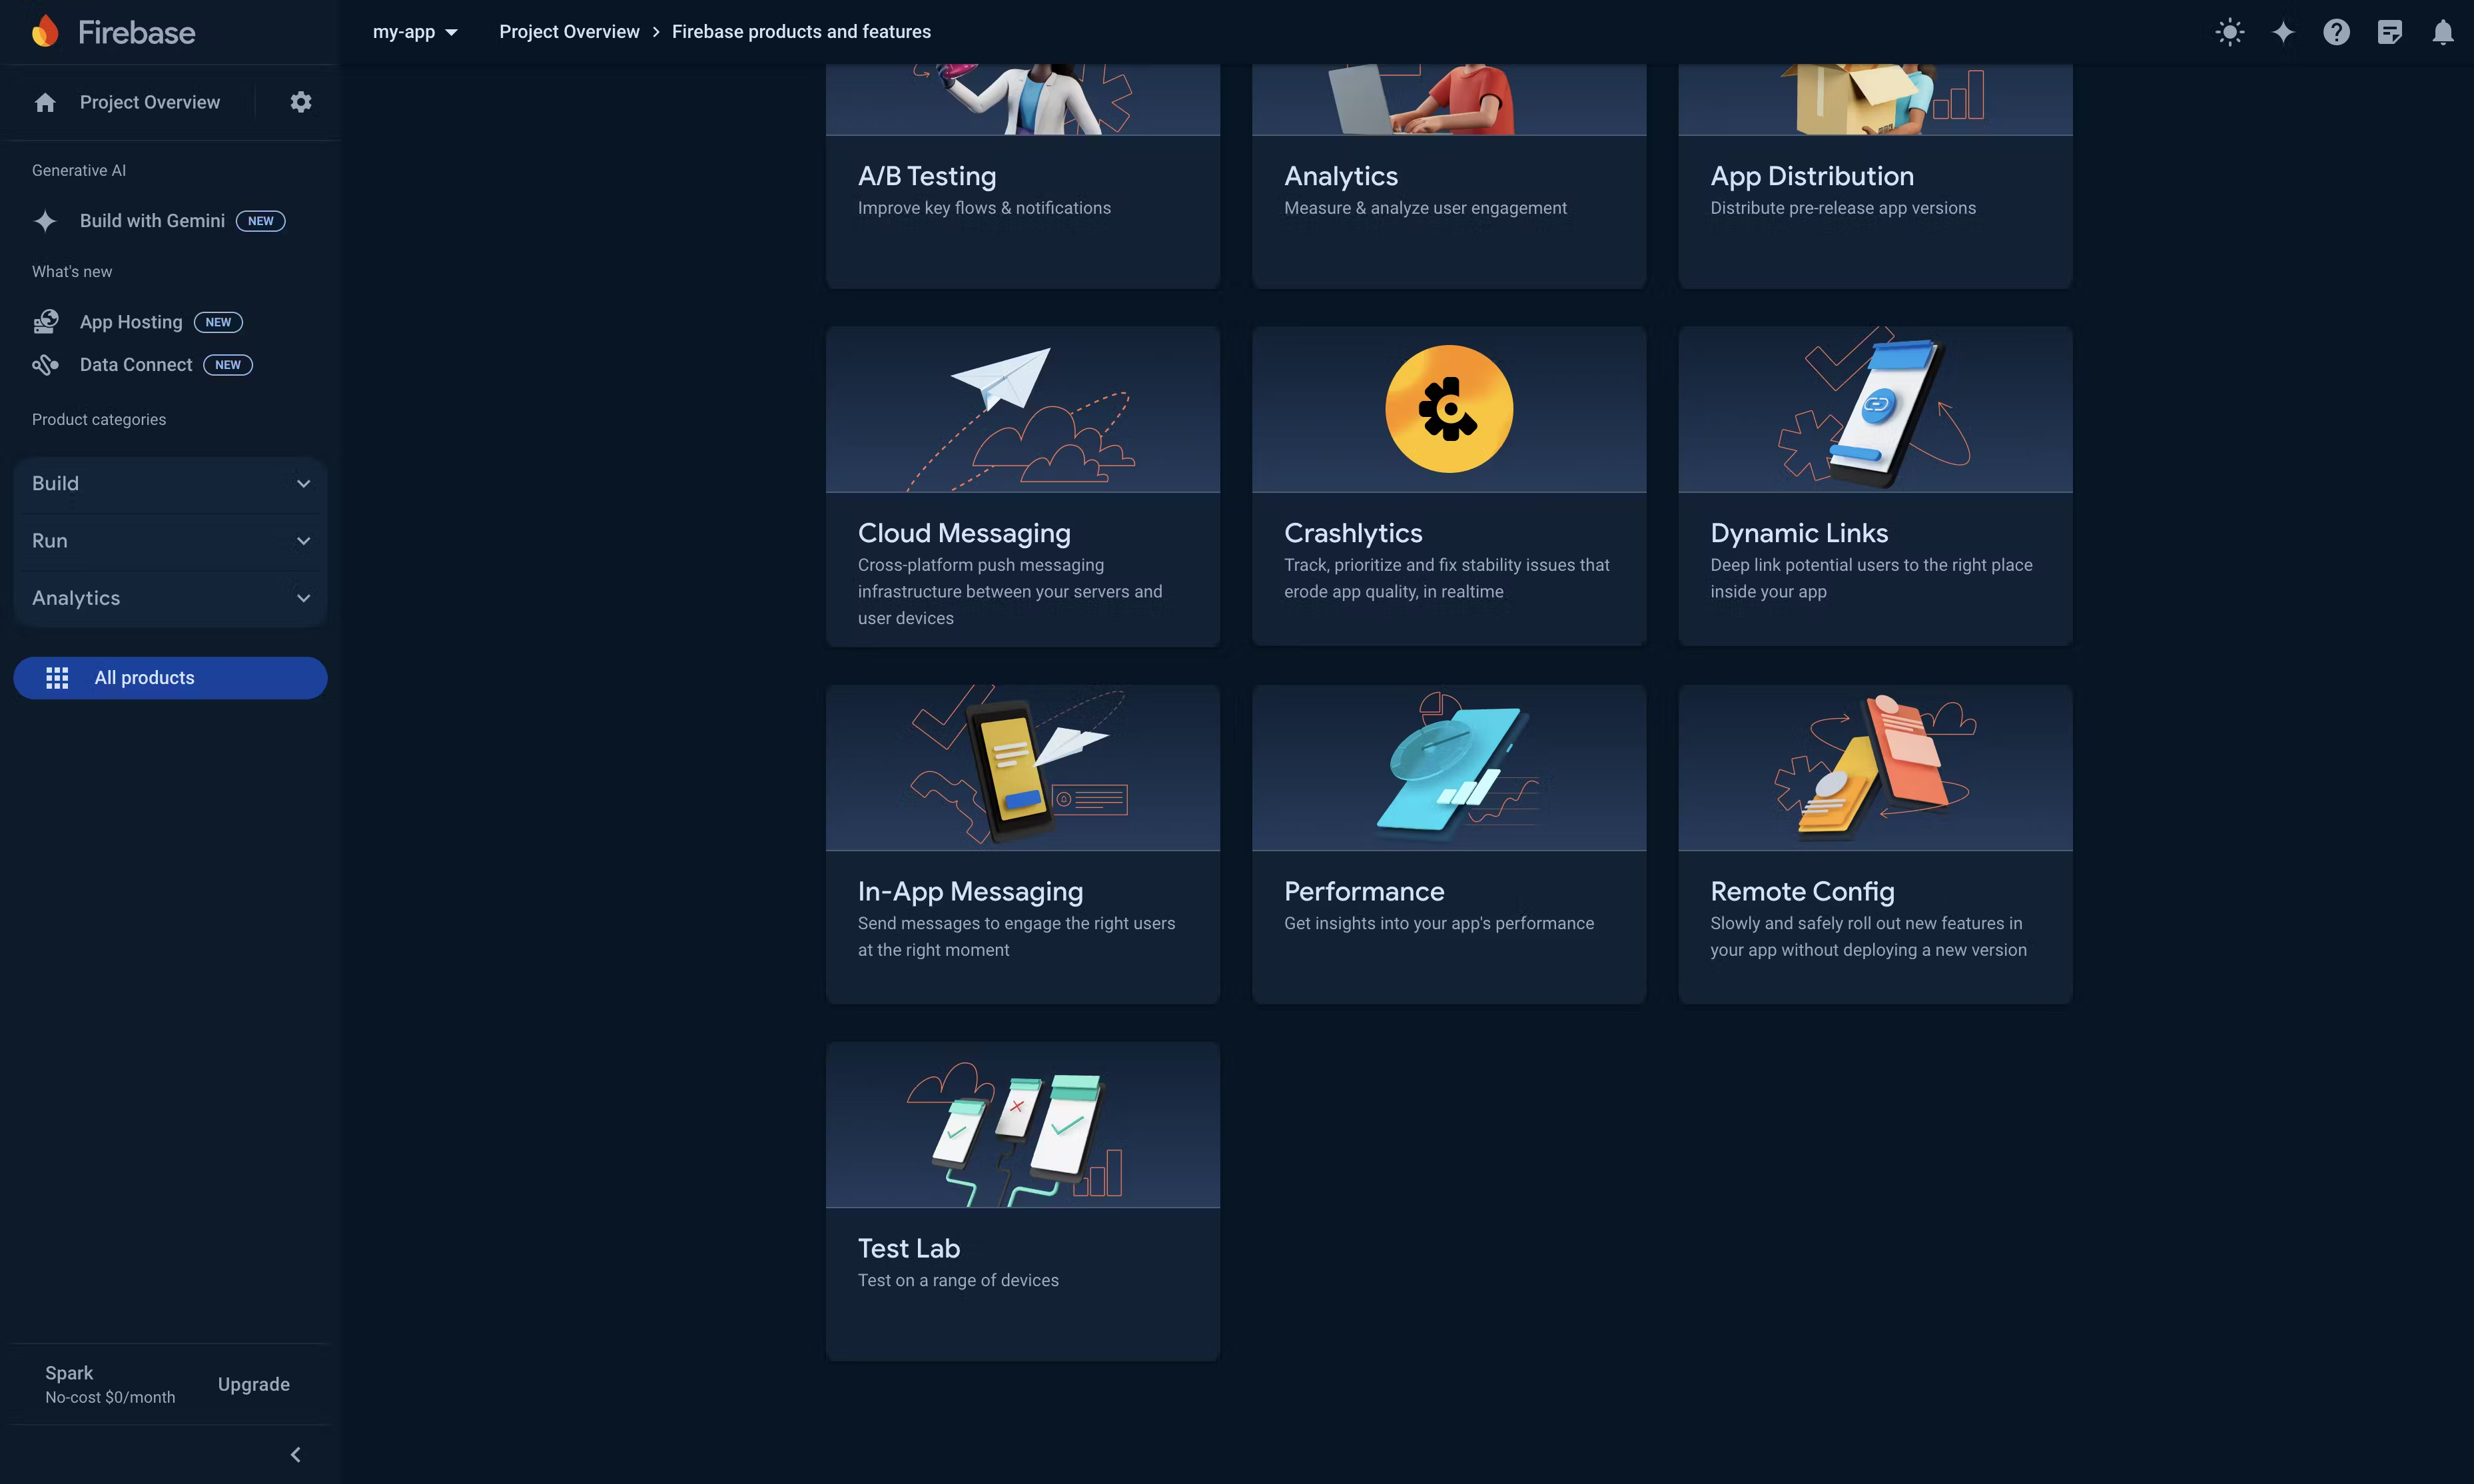
[ Note: Running tests on Firebase Test Lab doesn’t require integrating Firebase functionalities within your Flutter app. You only need a Firebase project to get started. Test Lab operates independently of whether you use other Firebase services. ] - Once your project setup is done, inside the firebase console go to the All Products section on the left panel and then select Test Lab from the options.
- If you open the test lab for the first time you may see something like this (Otherwise you can skip this step):
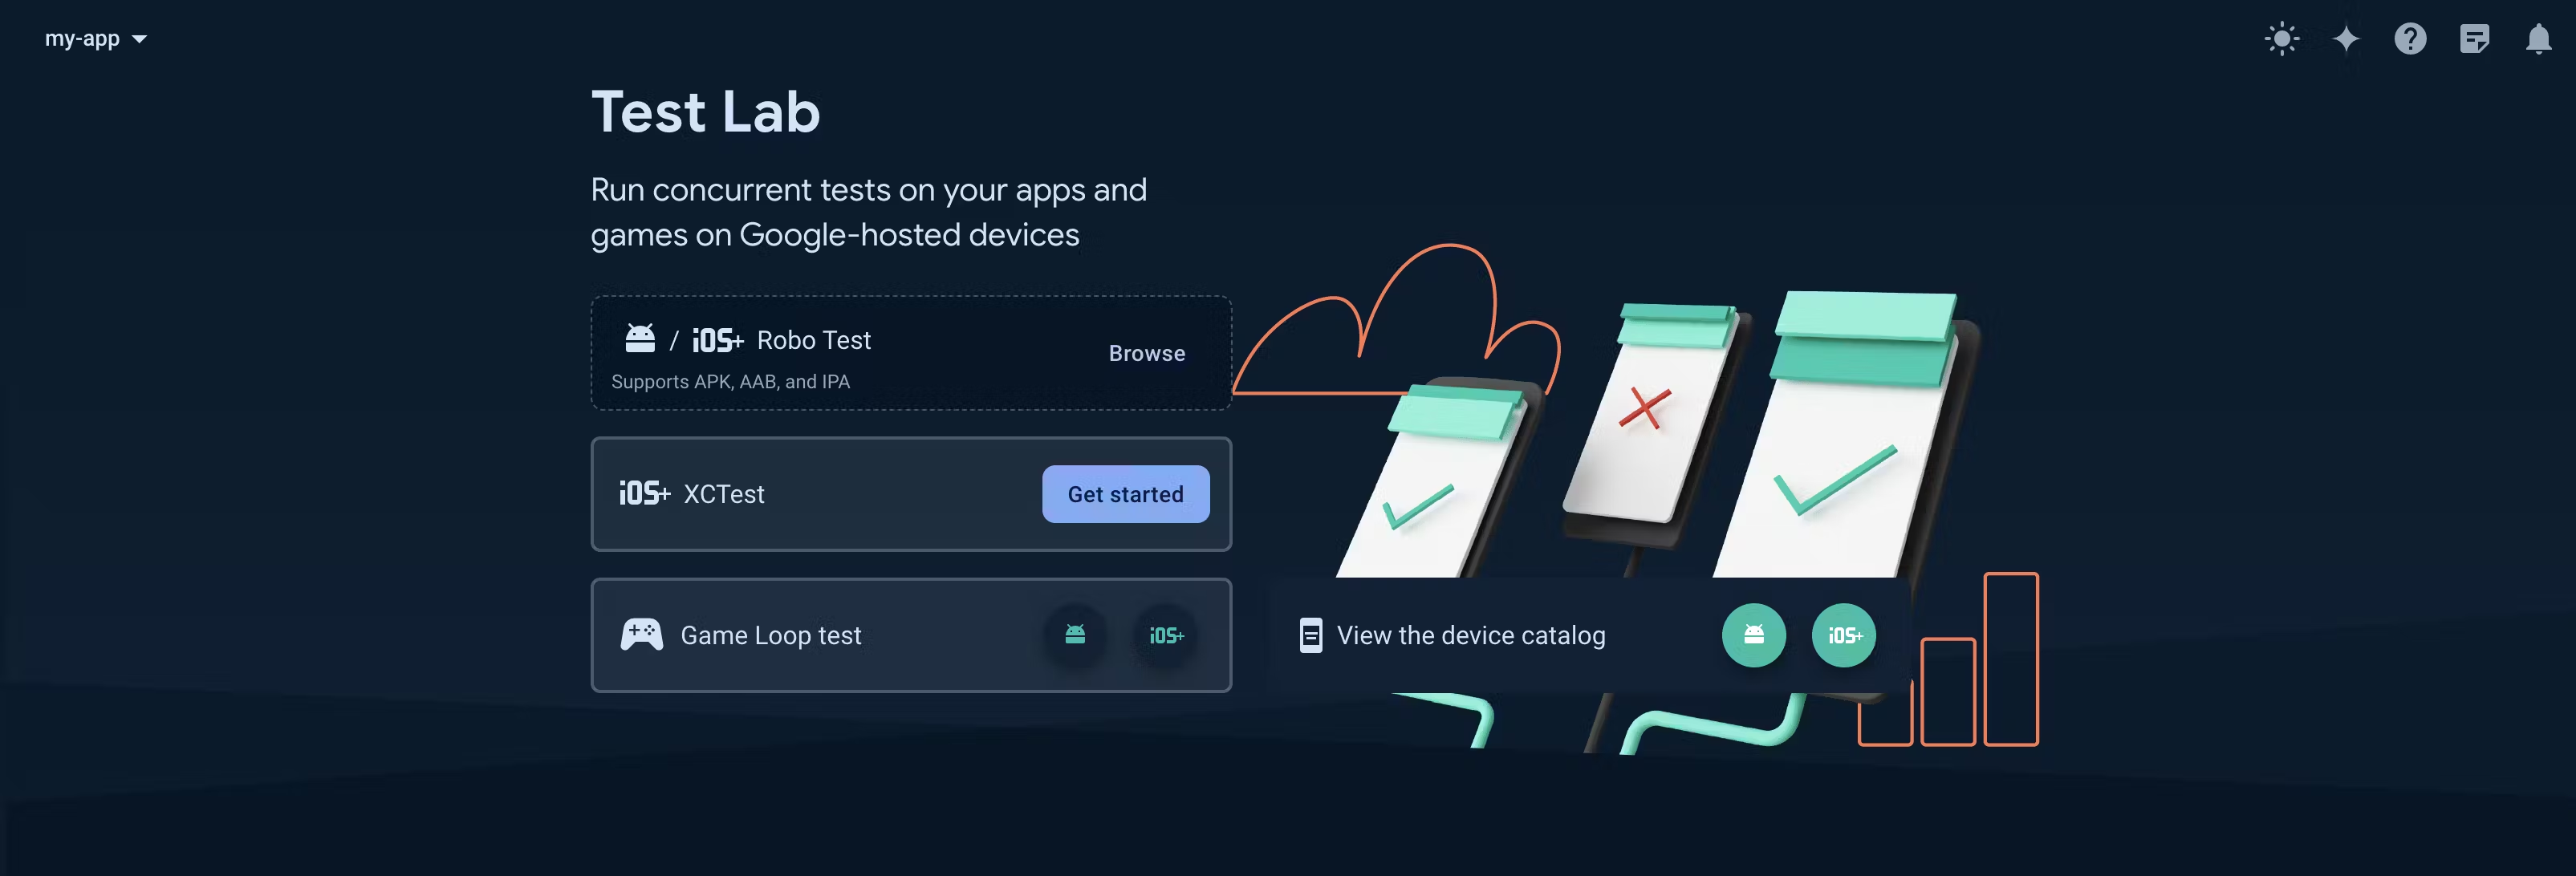
- now here we have to run a Robo test first. Click on the Browse button and select the
build/app/outputs/apk/debug/app-debug.apkfile from the file picker and start the robo test. You can wait till the test is finished, or you can also cancel the robo test.
Run Instrumentation Test
- Now if you open the Test Lab you will see the previous test(s). Click on “Run a test” button and select “Instrumentation”. Then you will be asked to upload the two apk files that we have generated earlier.
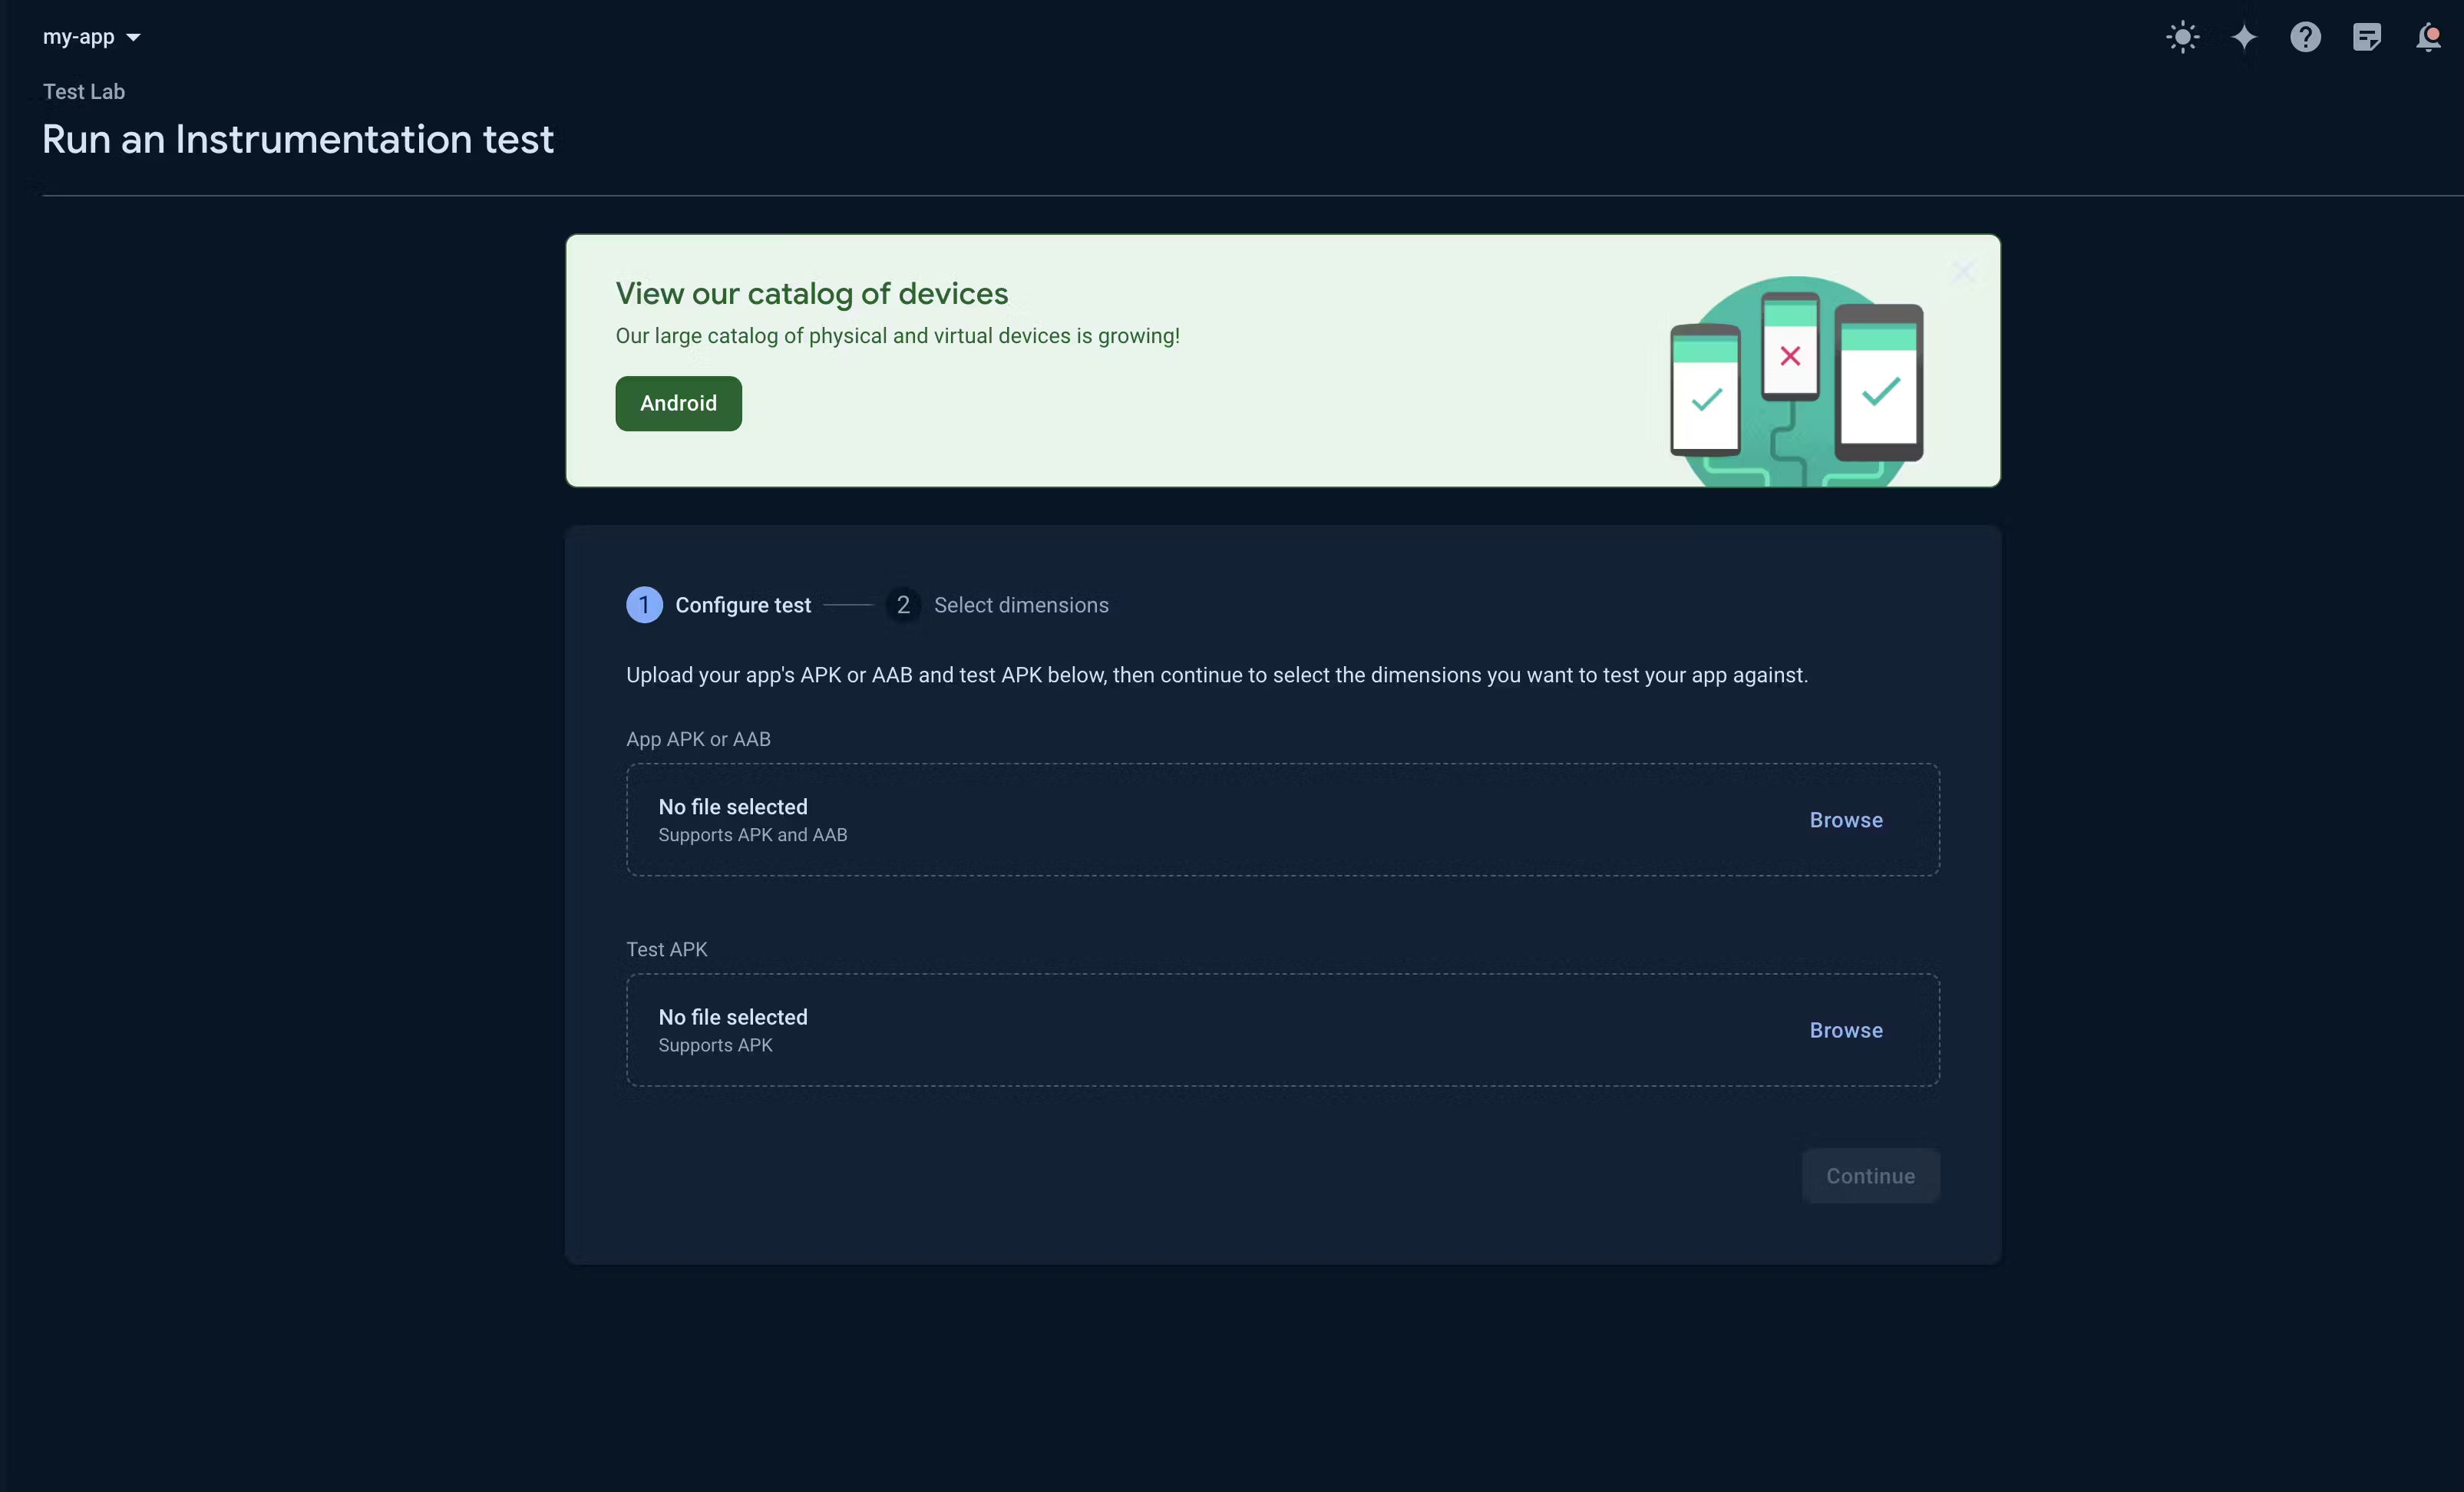
- Click on the Browse button for the App APK or AAB and select the
build/app/outputs/apk/debug/app-debug.apkfile and then click on the Browse button for the Test APK and select thebuild/app/outputs/apk/androidTest/debug/app-debug-androidTest.apkfile.When the files are uploaded successfully, click on Continue. - If you haven’t selected any devices, you will be asked to select the devices you want to run your tests on. Click on Customize and select the devices and then Confirm the selection.
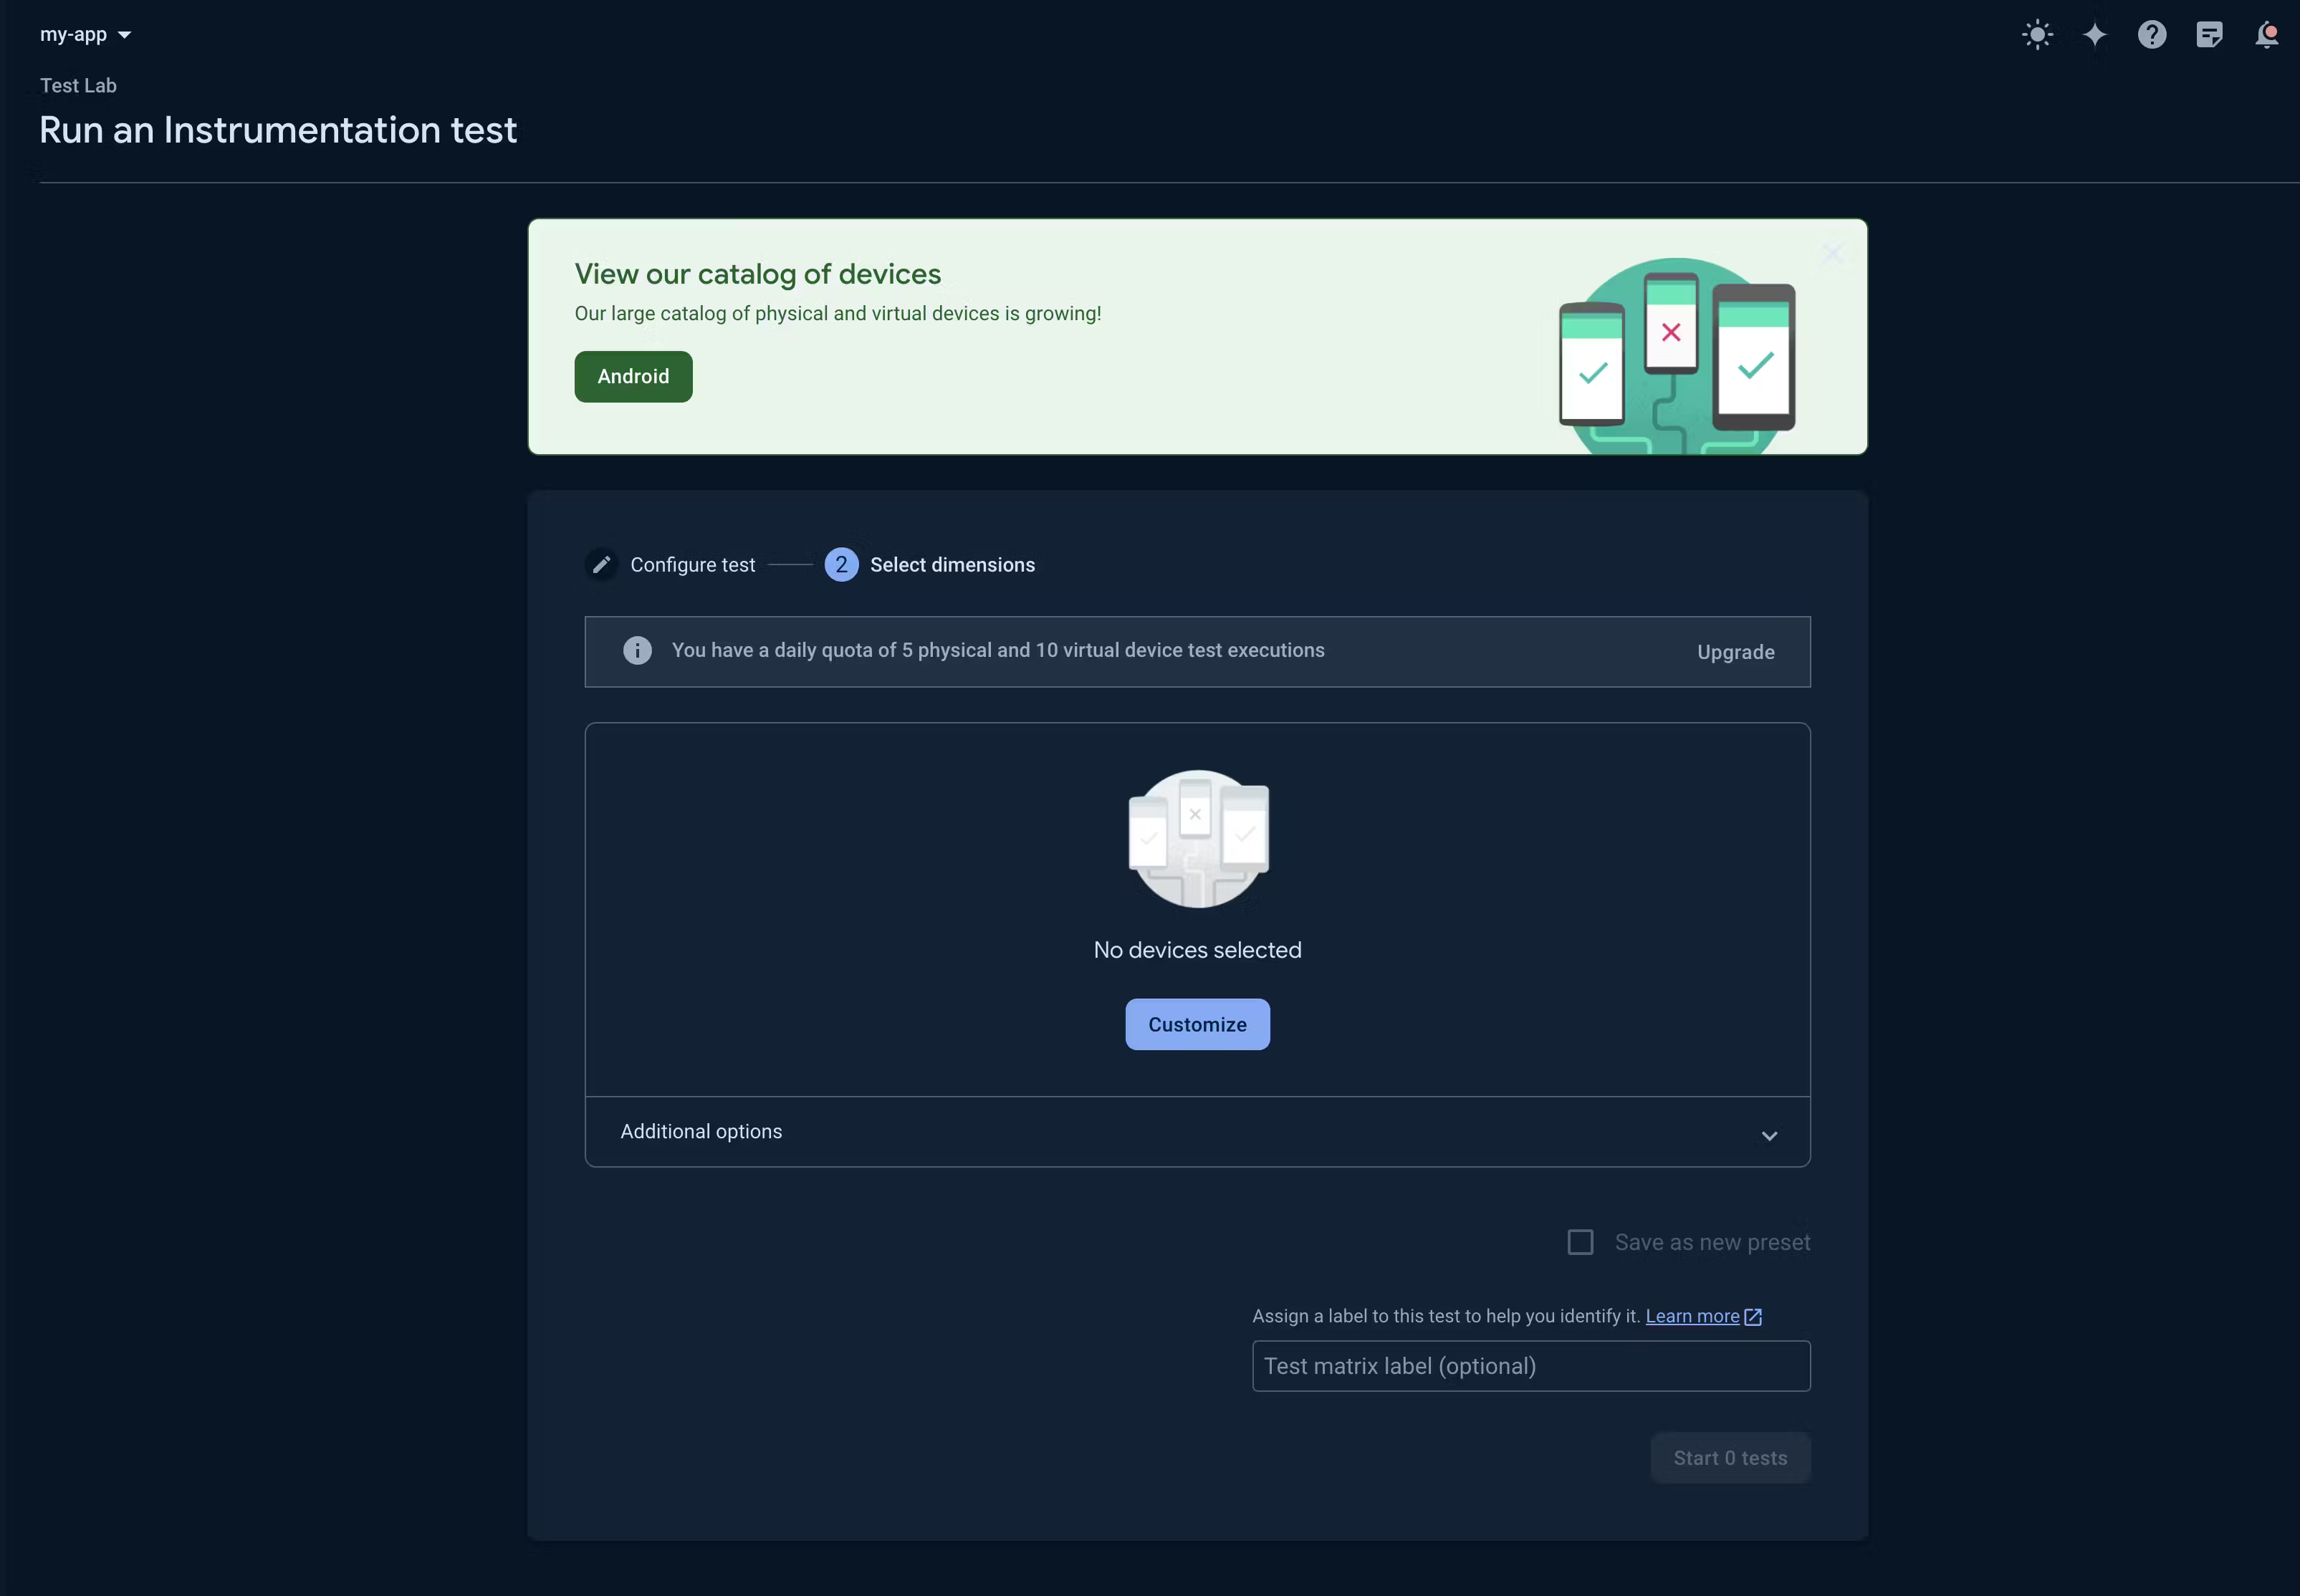
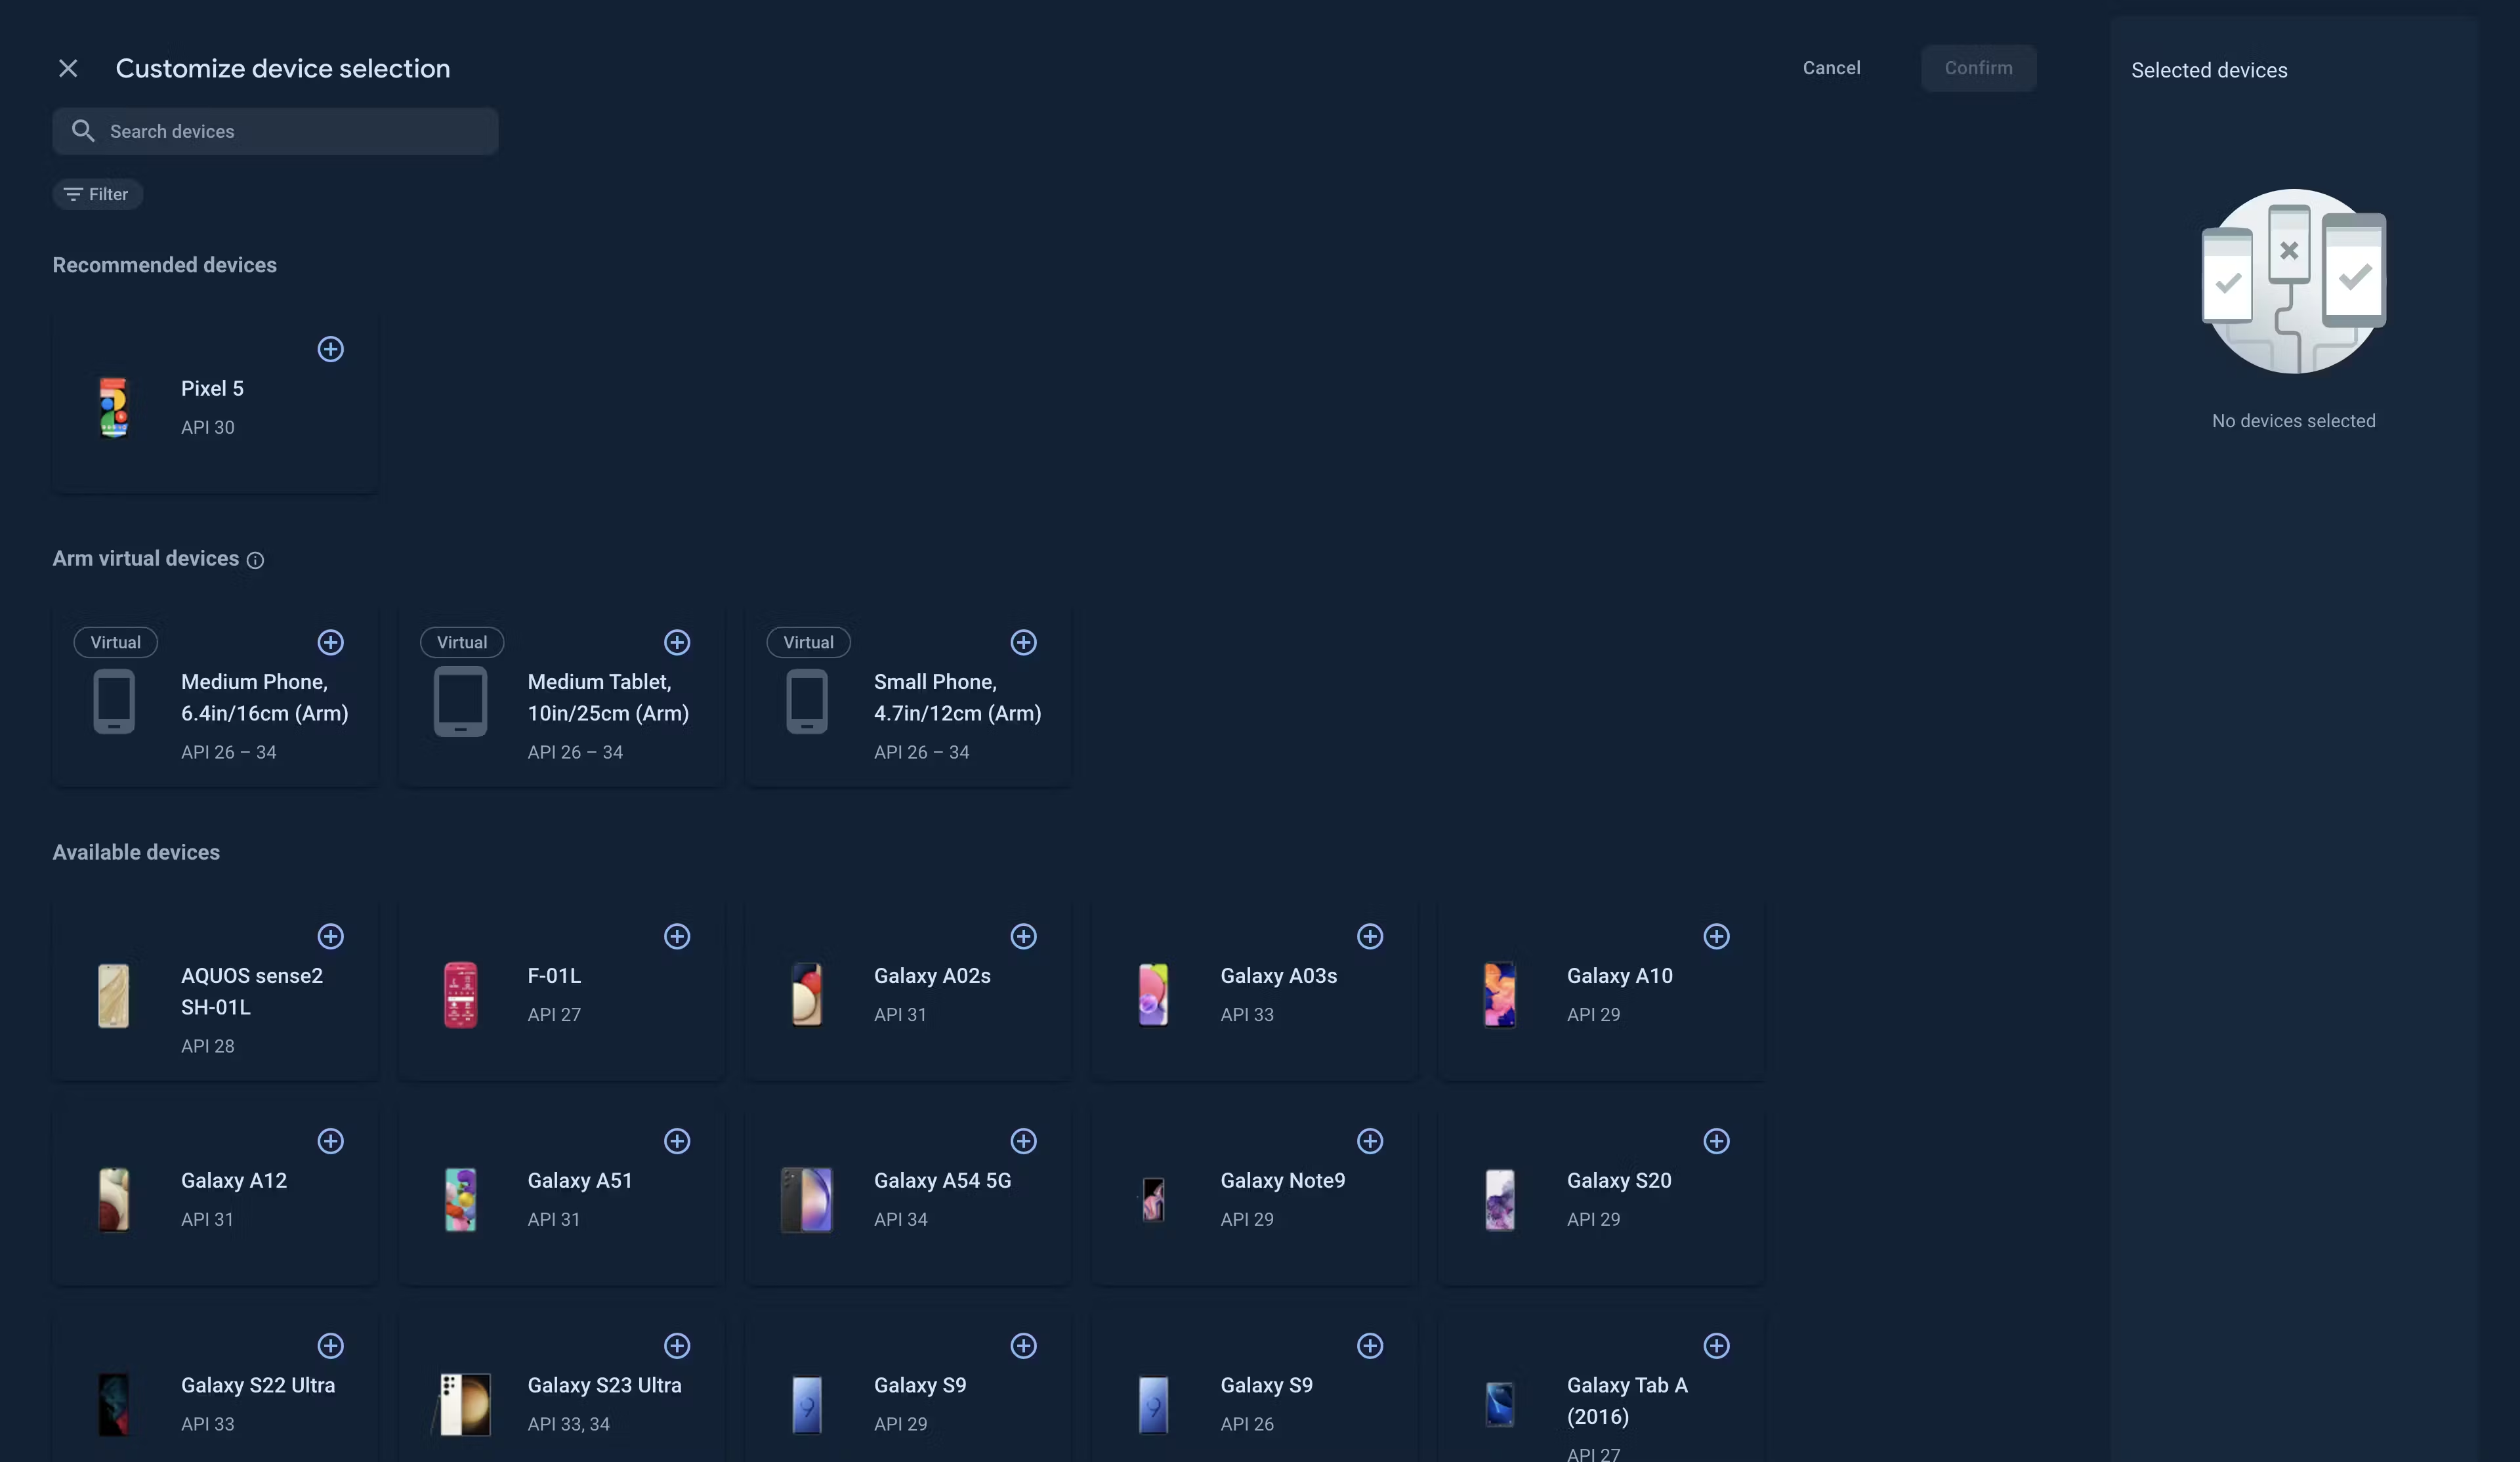
- Click on “Start 1 test”.
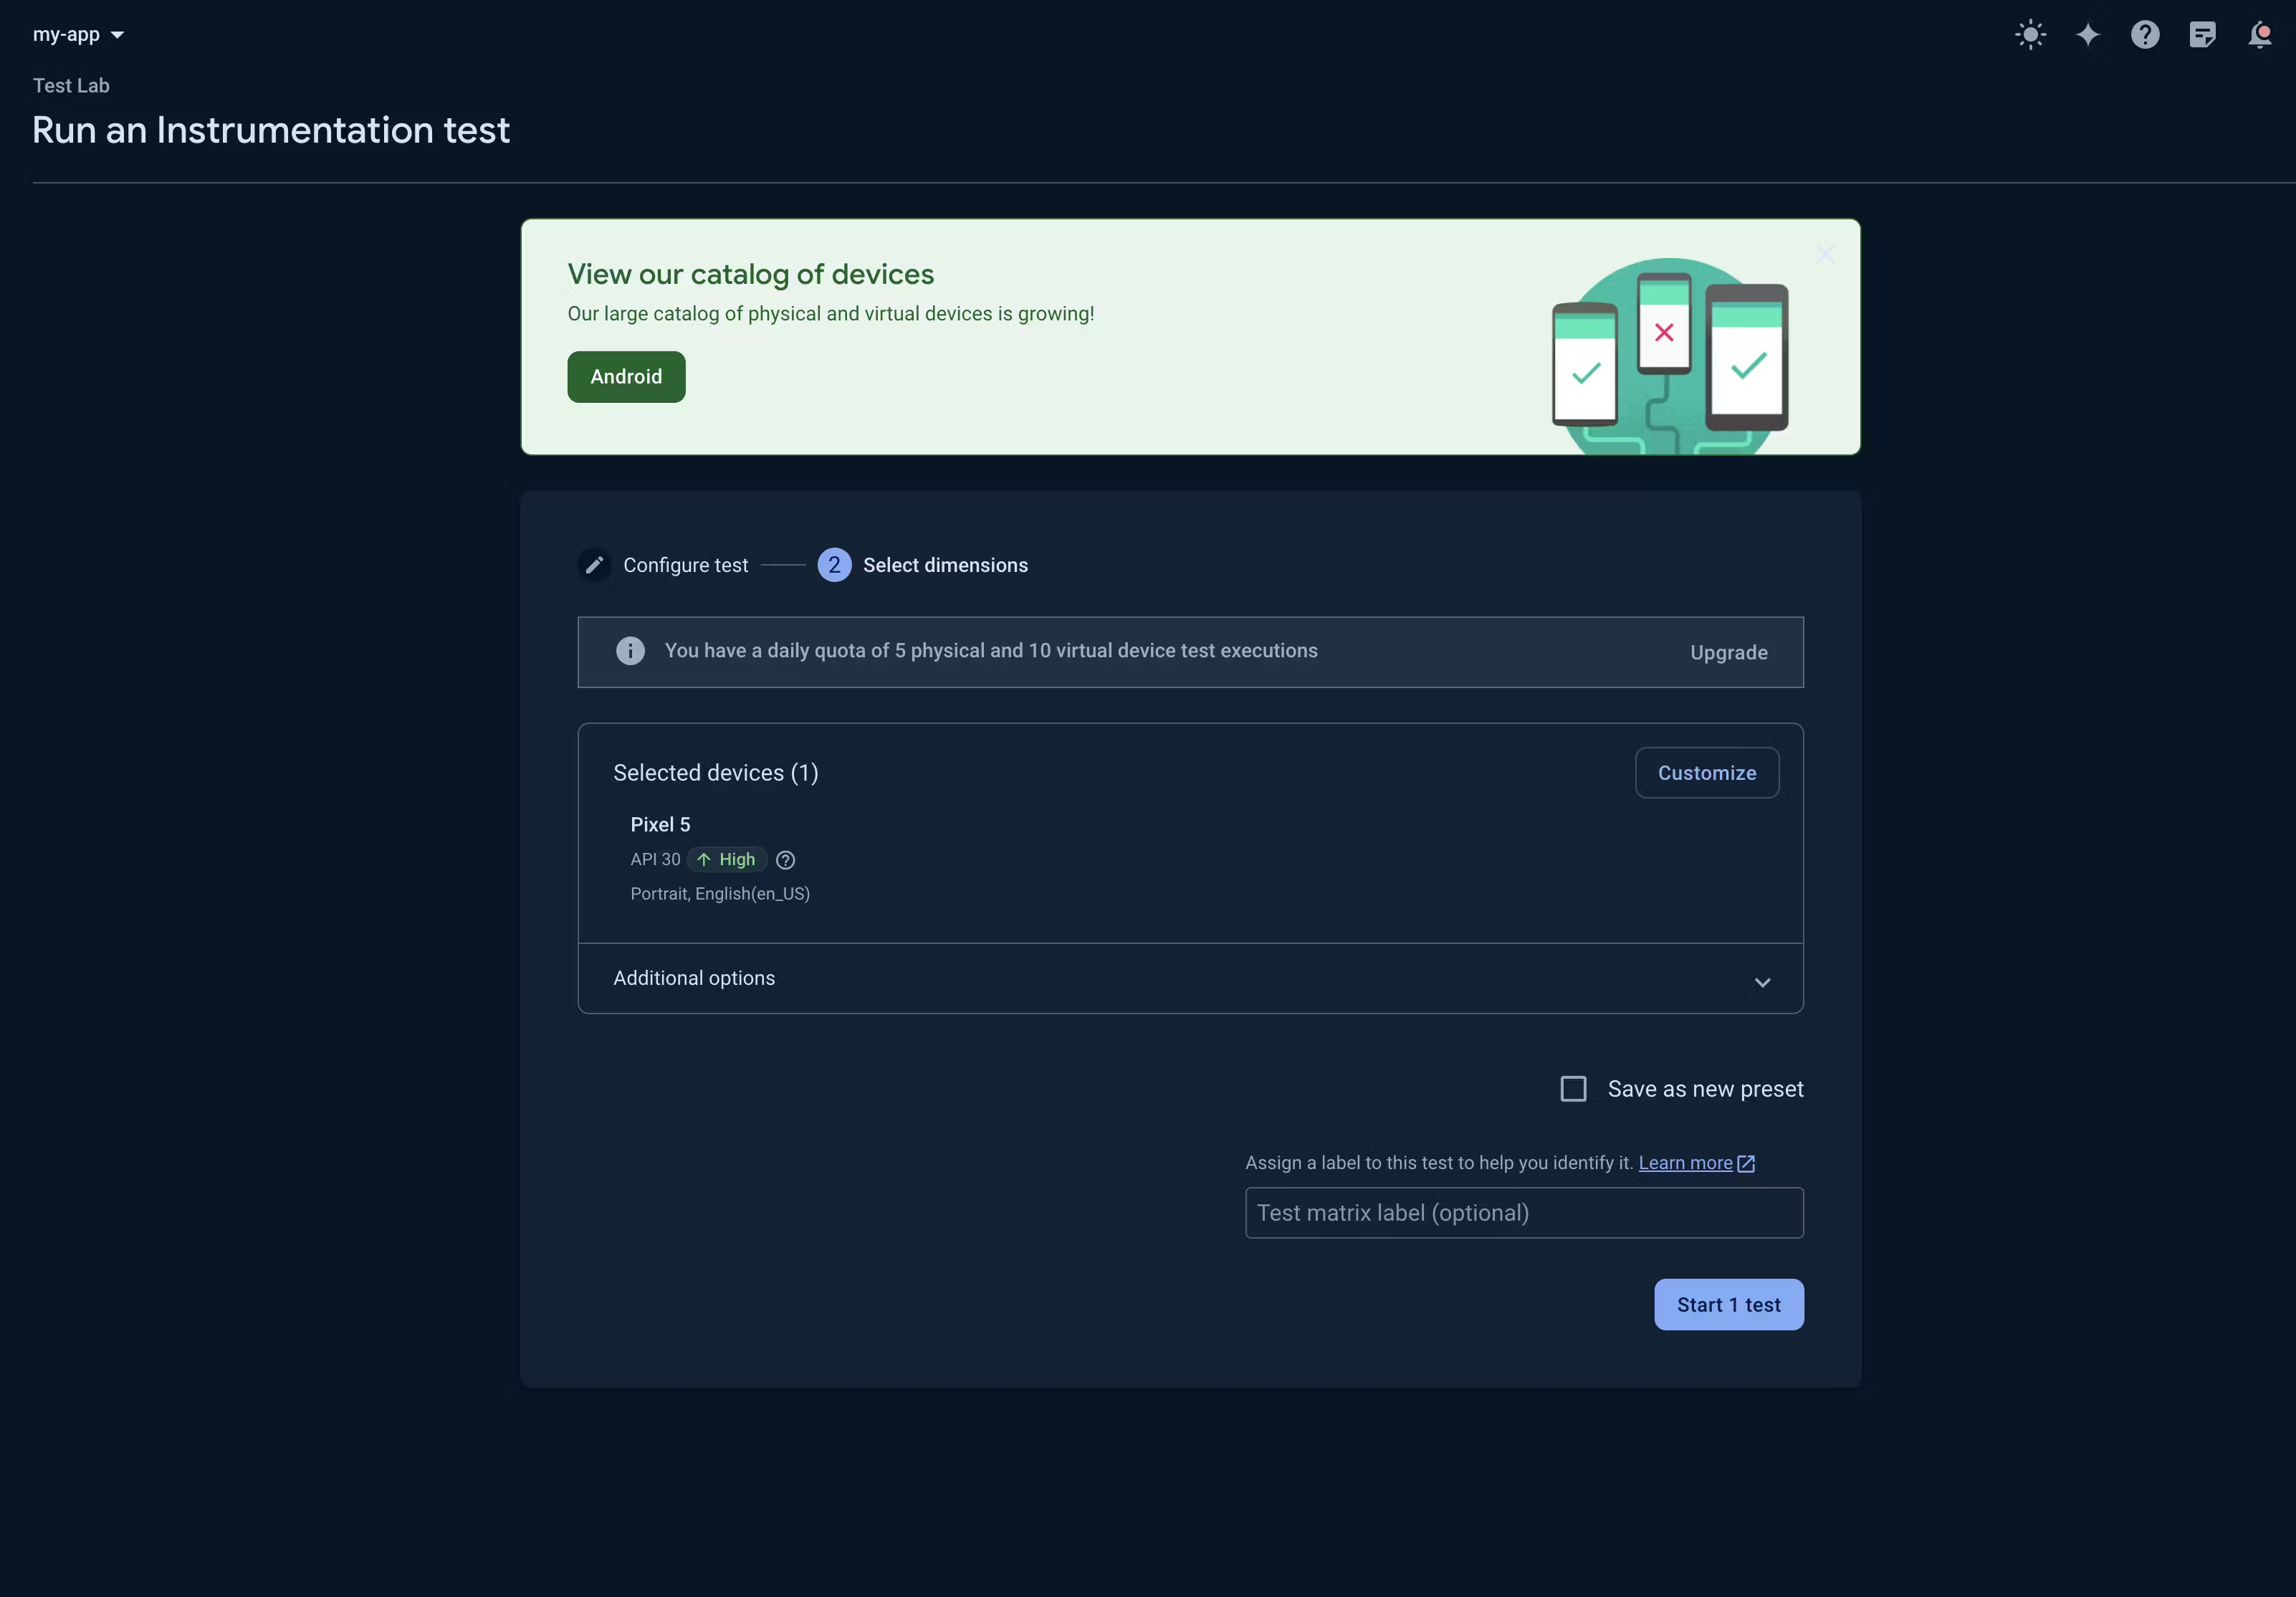
The test will be started. If the test is fails for some reason you will see the status of the test as failed. Otherwise if the test is successful, you will see the test details and report as below:
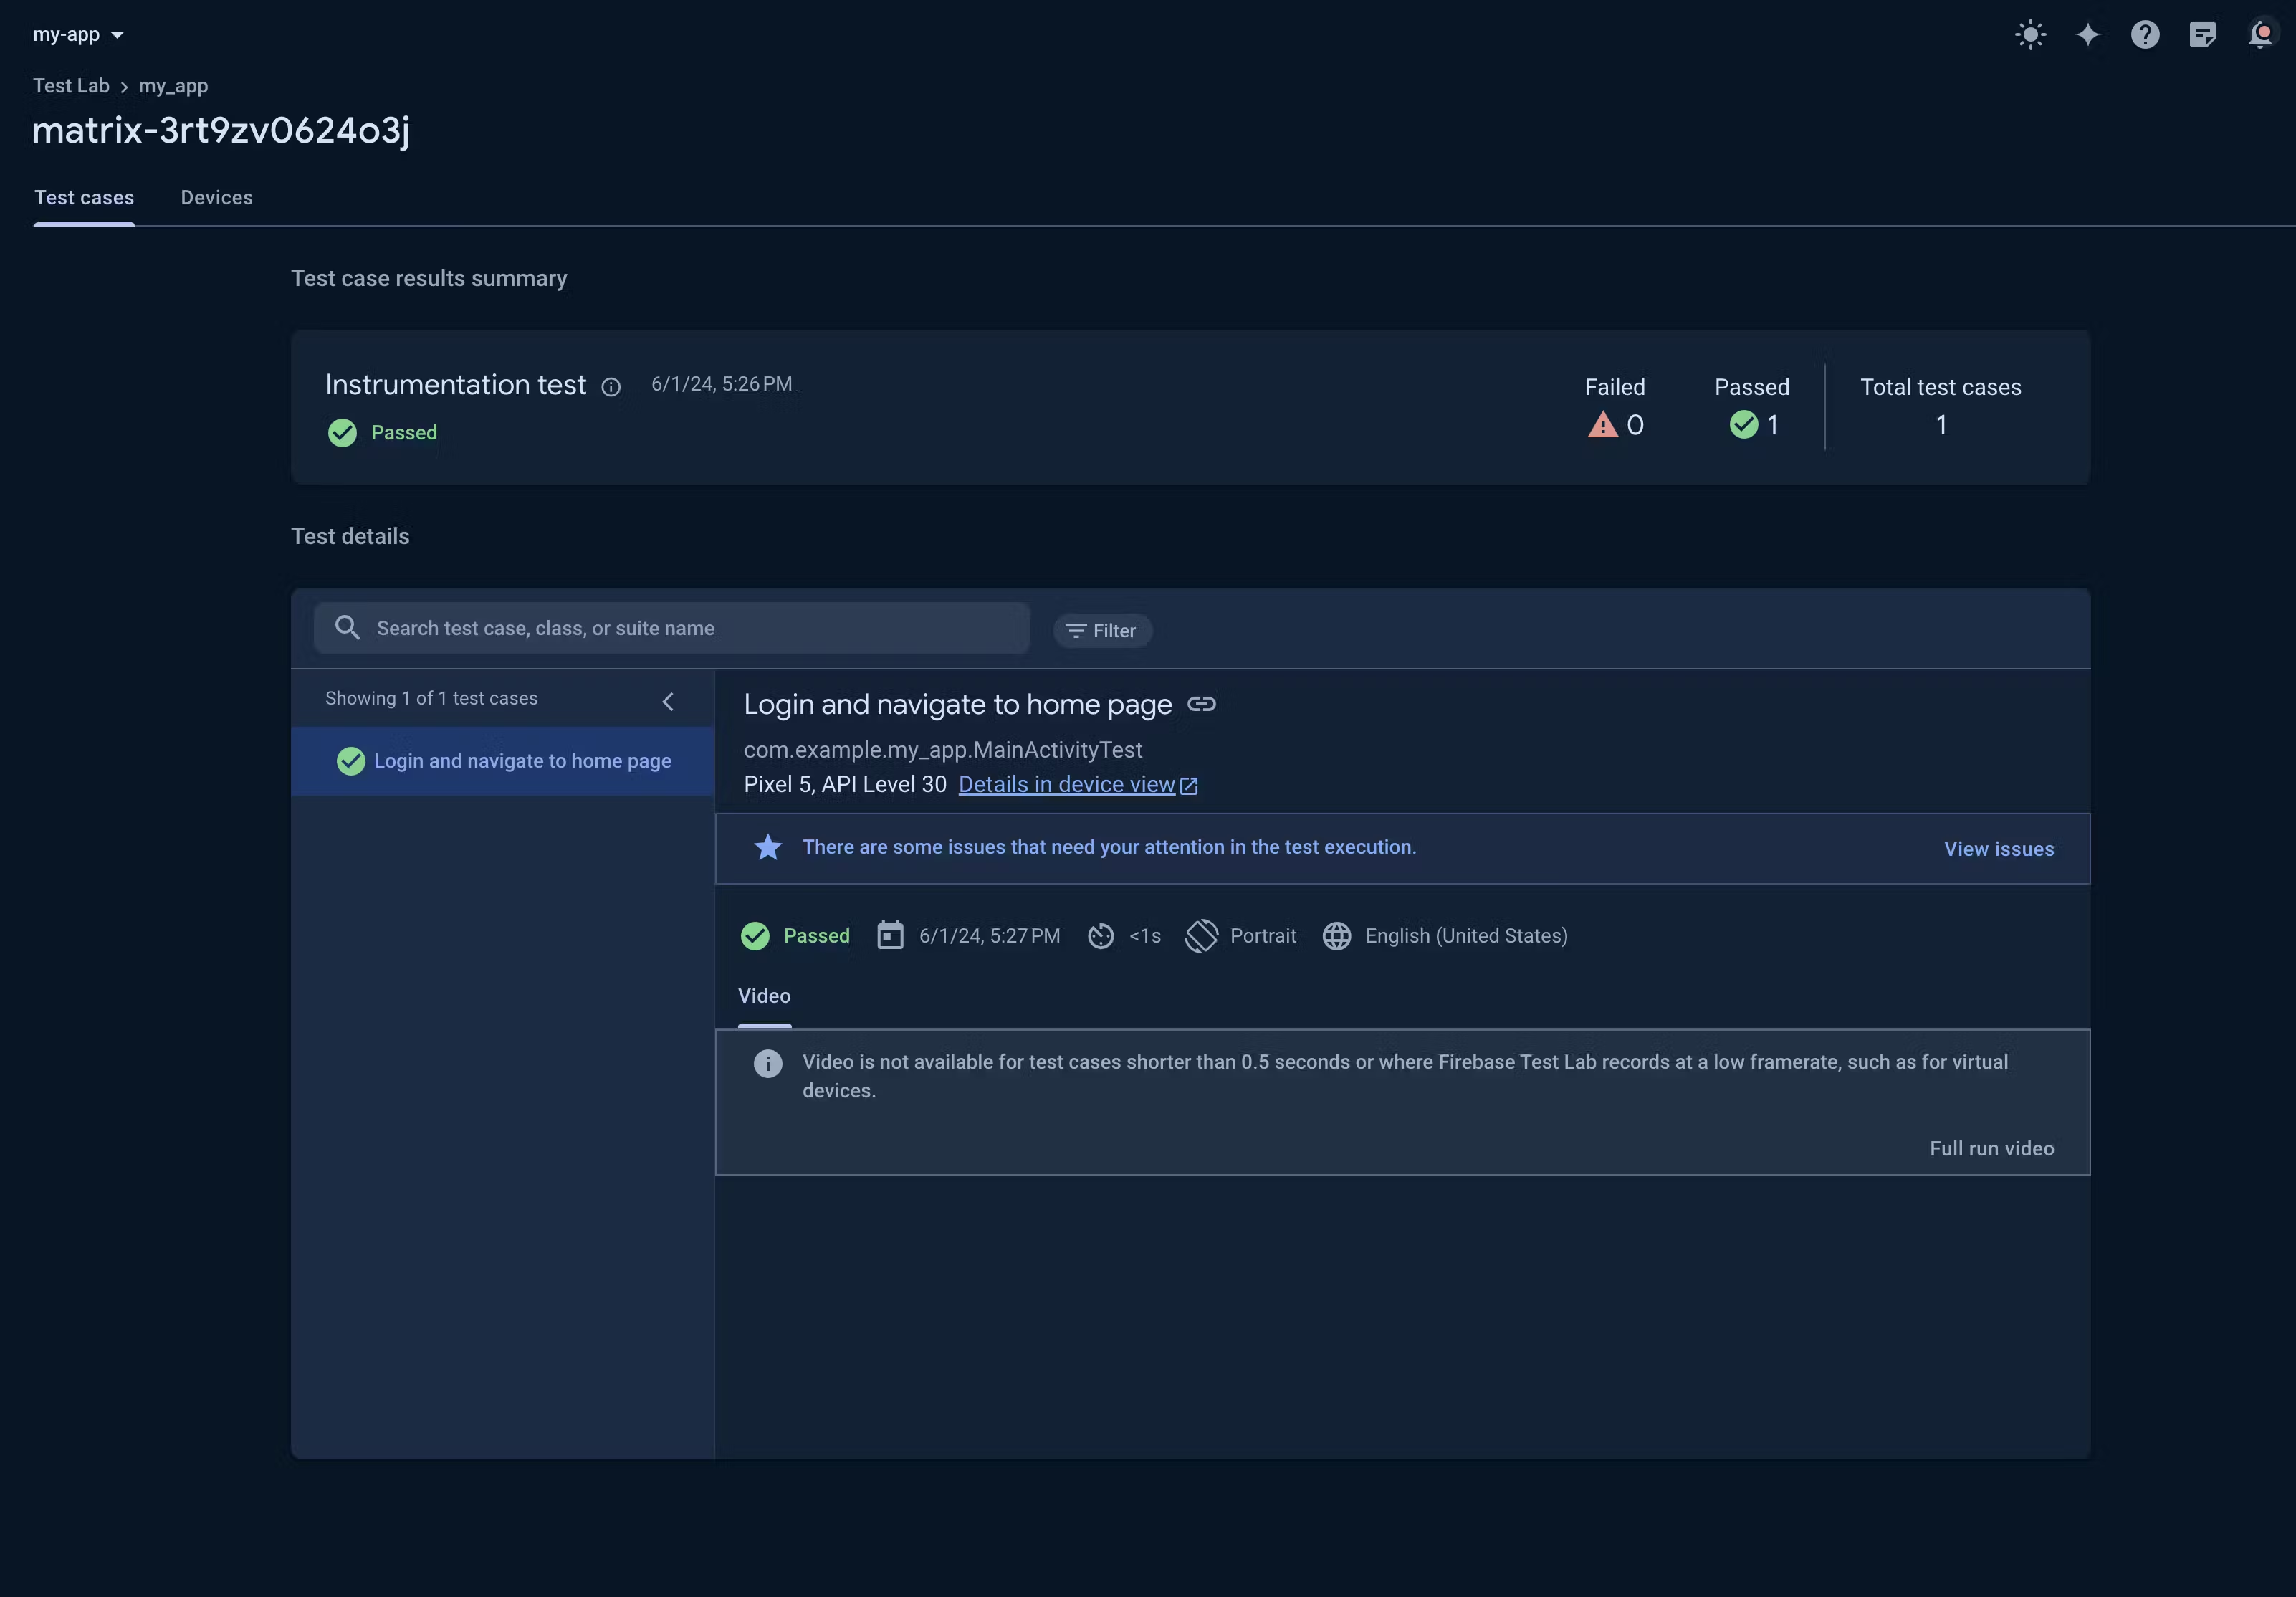
- Click on “Full run video” and you will be able see the options to view Test Issues, Logs, Videos, Performance metrics, Test Cases.
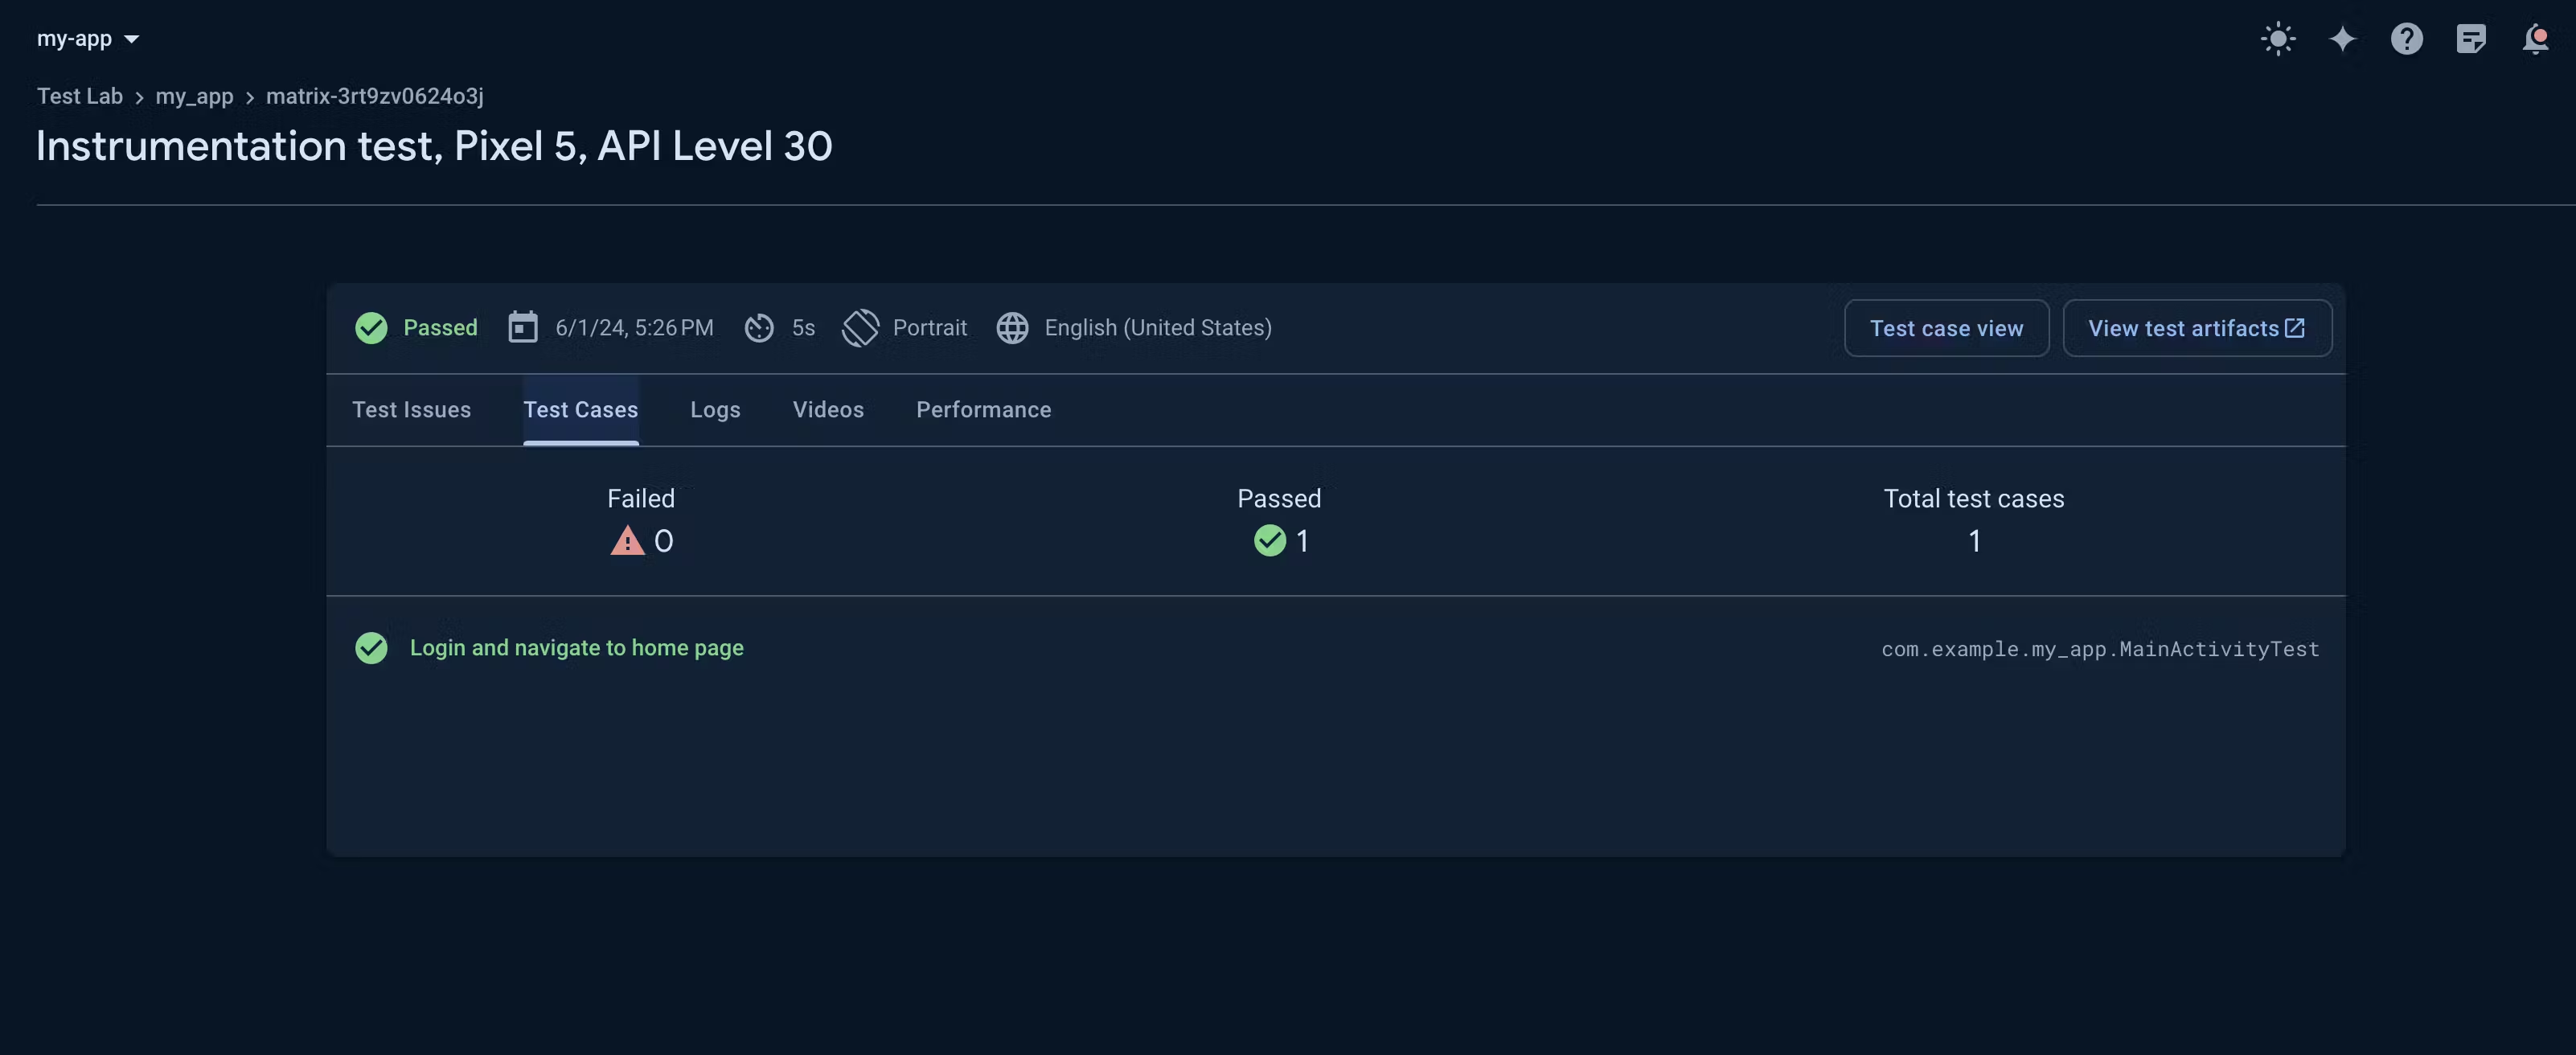
Congratulations!!! you have run your Flutter Integration Test successfully on Firebase Test Lab
Summary
This blog post teaches you how to run integration tests on your Flutter app using Firebase Test Lab. Integration testing helps catch bugs between different parts of your app. Firebase Test Lab offers a wider range of devices, automatic testing, and a controlled network environment compared to local testing.
In the Second Part of this blog post, we will learn how to automate this whole process using GitHub Actions.
If you found this blog helpful, let me know in the comments below! Your feedback is always appreciated.
Want to learn more about integration testing in Flutter? This blog post just scratches the surface. Feel free to ask questions or suggest future topics in the comments!
To know more about topics like this, you can follow me on LinkedIn & X.
Thank You
Happy Coding

